Quantcast
Channel: ZedHair
Viewing all 206 articles
Browse latest View live

Length Check Schmeck; why the fuss?

$
0
0
By Chiteu of http://www.bellamufazi.tumblr.com

I was having a chat with my friend Masuka and we got to the topic of length checks. Last year I planned to do a length check in December and lo and behold December is about to roll around again and I stiiiiiill haven’t done it lol

As we spoke we both realised that length is no longer an issue for us really. I know some will say it’s because you have achieved length or whatever your goal may have been but to be completely honest I had a goal length, I have not reached it but I can’t be bothered because I am simply enjoying my hair.

In as much as length retention is cool, healthy hair has become more important and the length that comes with good hair practices is a bonus.

I have to admit at some point this year I contemplated big chopping again just to show those getting frustrated with their TWAs that its more about how you care for your hair, tweeking and fine tuning your regimen to suit your hair needs and wearing your hair loud and proud. Ever since I stopped caring so much about length I feel like my hair has actually retained length and is longer. I am staying out of my hair more,doing more protective styles, baggying….all of which are good hair practices which now = length.

Focusing on length puts unnecessary pressure on you and will only lead to frustration.

So to all of you that are trolling the web *and especially Pintrest* drooling, sighing heavily and dreaming about the day your hair will be waist length,be kind to your hair, learn and practice good hair habits. Most importantly ENJOY  YOUR HAIR!!!!!


Protective Style Challenge: Week 13; Afro Minnie

$
0
0

IMG_3841[1]

This week’s hairstyle is another simple one but it took a little longer to achieve as I had one idea in mind but had to alter it because my hair was not particularly stretched. I washed my hair over the weekend; a one step co wash/conditioner treatment which consists of applying a mixture of conditioner, honey, apple cider vinegar and coconut oil to dry hair, leaving it on for half an hour under a plastic cap and rinsing before sealing and plaiting fikuti (braids).

One of the things that I’ve learned on this journey so far is that you can’t force your hair to behave a certain way. Instead you must learn to compromise and choose hairstyles that compliment the mood of your hair on any particular day. Yes, I used the word mood to describe hair.

I’ve got a set of pictures that are saved on my phone for this challenge. Every time I see a hairstyle that looks interesting, I download it and I must admit I don’t always know which hairstyle I will choose even up to 5 minutes before I do it. I started out this week thinking I wanted a high bun but ended up with a bow instead. This was an amalgamation of two styles that I have saved, one of which is by former Natural Spotlight feature, Esiya.

received_10153148307616757[1]

Former Natural Spotlight, Esiya

bb338c4624931274ef3848cce95b2647[1]

I got the idea for the back from this hairstyle.

 Step 1:

Part the hair in two, dividing it from ear to ear and tie the front of the hair away. You can also use a hair clip for this.

IMG_3791 Step 2:

Plait a mukule (cornrow) upwards from the nape to the middle of the head.

IMG_3817

Step 3:

Tie the front section into a puff. I used a band made from an old pair of tights for this because it allows me to regulate the size of the puff. I wanted the puff to be big enough for the creation of the bow.

IMG_3819

Step 4:

Take a section of hair from the front, middle of the puff and pin it to the back to create the look of a band.

IMG_3811

Step 5:

Hold together each tip of the remaining halves and pin them backwards puffing them up to create your desired shape.

IMG_3820 IMG_3823

I cheated a little by plaiting a cornrow at the back because I knew that my hair wasn’t stretched enough to create a bow without doing so. The tip of the cornrow is pinned into the middle of the puff.

IMG_3825

And there you have it, an Afro Minnie Bow!

PhotoGrid_1429022687550[1]

I’ve had many puzzled looks to the top of my head already. This has got to be one of the more outlandish styles that I’ve tried but I must admit, I love how quirky it is.


Protective Style Challenge: Week 14; Chain of Twists

$
0
0

_MG_5029

When I’m not looking up hairstyles on Pinterest then I’m probably scrolling through Instagram. Recently, I discovered TjLuvsBeingNatural and instantly fell in love. Her styles are simple, yet look intricate. She’s enormously creative and I’ve already earmarked a few more of her other styles to try later on during this challenge, although I’m not quite brave enough to go the whole hog and shave the sides of my hair.

Screenshot_2015-04-15-15-02-41[1]

I washed my hair this weekend; it was a long wash day as I decided to do a henna treatment. I use pure henna, none of the branded stuff. I twisted the damp hair so that it would be stretched for today.

I called this hairstyle “Chain of Twists” because that’s essentially what it is.

Step 1:

Divide the hair into sections. I sectioned mine into 5.

_MG_5000

Step 2:

Plait the first section into a large fairly loose two strand twist, divide the second section in two and place the first twist in the parting.

_MG_5011

Step 3:

Having placed the first twist in the middle of the second section of hair, twist the second section in a manner that secures the first twist. I need the style to last all week so I added pins to further secure each twist.

_MG_5005

Step 4:

Continue step 2 and 3 until you get to the last section.

_MG_5016

Step 5:

Pin the final twist into a pompadour. You can play round with it until you achieve a shape that you like.

_MG_5018

This is actually a very similar, less dramatic, hairstyle to the one I did in Week 4 of this low manipulation, protective style challenge. The weather in Lusaka is turning a bit and I may need to do a little more spritzing this week to keep my hair moisturised.

PhotoGrid_1429530977470[1]


Wash Day With Mud

$
0
0

By Brandi of http://www.hairinsights.wordpress.com

Well….technically it’s clay, Bentonite clay.

For those who do not have a clue what it is:

Bentonite clay is an impure clay that forms as a result of aged/weathering volcanic ash and water.  It’s an ideal clay for cleansing and detoxifying, as it has the ability to remove positively charged (cationic) conditioners and products that can build up on the hair and scalp. It is also said to have the ability to draw out toxins, heavy metals, chemicals, and impurities. It helps cleanse and lift impurities from the hair, aiding in conditioning, shine, softness, and definition.For best results, use Aloe Vera Juice and/or Apple Cider Vinegar to mix instead of water. These will make your mix more acidic, and closer to the pH of your hair. -Via BlackGirlLongHair

So essentially it is an all in one clay: cleanses, clarifies and conditions hair in one glorious step. Can you say miracle clay?! I bought a tub from Link Pharmacy at the Main mall and it only set me back P31. It will probably last more than half a year because I’ll only use 4 tsps once a month. So in addition to being awesome, it’s cheap! Convinced yet? In addition, it is easier to use and less of a chore than henna. You mix it, apply immediately, 30 minutes later you rinse it off. You can choose to condition your hair afterwards or simply continue with your moisturize and seal routine. I LOVE this clay!

???????????????????????????????For my mix I decided to use honey, aloe vera juice, olive oil and castor oil. I used the following recipe:

  • 2 tspns of castor oil
  • 2 tspns of honey
  • 2 tspns of olive oil
  • 4 tspns of bentonite clay
  • enough aloe juice to make the mixture a yogurt consistency

Because the clay reacts with metal, I used a plastic spoon and an old plastic conditioner tub to mix it in.

???????????????????????????????

I was not able to get my mixture smooth enough but it didn’t matter really, I was still able to apply the clay thoroughly. I covered my head with a plastic bag then followed it up with my foil cap and my shower cap. I had to step out to the mall so I left it on longer than 30 minutes.

???????????????????????????????

After I rinsed my hair, it felt fabulous!!! It felt absolutely magical, my hair has never been so soft!! I am in love with this clay. I can hardly wait for next month when I apply it again! Unfortunately if overused, it can have a drying effect so the general rule is to use it once a month.

???????????????????????????????I chose to condition my hair and do an apple cider vinegar rinse afterwards because I had time but I could have skipped it.

I don’t have any after pictures however I thought I could share more pictures of my straightened hair in a “twist out”…

??????????????????????????????????????????????????????????????


Protective Style Challenge: Week 15; Mukule Bun

$
0
0

IMG_5482

I’ve called this week’s hairstyle the Mukule Bun. Mukule is the Bemba word for Cornrow, Bemba being a language that is quite widely spoken in Zambia.

I’ve wanted to do a bun of this sort since the beginning of this challenge but I never thought my hair was sufficiently stretched to achieve a sleek look. This time I decided to stretch my hair by threading it. This is a method of wrapping sections of hair with cotton thread that is popular with people who would rather not use heat on their hair. This was the first time that I threaded my own hair and it was a lot easier than I imagined.

IMG_5446

I washed my hair on Saturday morning, threading it while it was still damp, after moisturising and sealing. I undid the threading or cotton this morning and re-moisturised the ends of my hair with a leave in conditioner sealing with an oil mixture before styling.

Step 1:

Divide the hair in two, leaving a U shaped section in the front for the Mukule pompadour. Tie the back section into as small a puff as you can get away with. Make sure the puff isn’t too tight. As usual, I used a band made from a pair of old tights. I like my buns high but this style would work just as well with a low bun.

IMG_5456

Step 2:

Loosely plait your mukule from front to back. Tuck and pin the end down.

IMG_5460

Step 3:

Place the hair in the puff into a bun maker. Pull the hair outward and pin it to the bottom of the bun maker. If your hair is longer or you use a smaller bun maker then you can probably get away with tucking the hair in rather than pinning it. If you are using pins you’ll have to play around with them to make sure they don’t show.

PhotoGrid_1430140334332

That’s it! I went for an especially simple style this week as I want to make sure my hair stays stretched for next weeks style. I’ve worked out a strategy to combat the encroaching dry weather but I’m jumping the gun; more on that next week.

PhotoGrid_1430139950203


Roll Tuck and Pin, Let the Camera Roll

$
0
0

By Rumbi of http://www.everythingamum.com

So this is my hair pictures’ story these days…

I live in a house full of “boys.” And they all seem to hate pictures. So you can imagine how annoyed they are each time we are about to get out and I say, oh Munya, may you please take a picture of me. It ANNOYS the life out of them. But me..I feel like each time I have a good hair thing going on, or am just dressed up, I should take a few pictures. And these days with this hair blogging thing I really want pictures taken. I can’t just come and say, oh my dear friends, I wore the loveliest hairstyle today. I rolled, pinned and tucked the hair. Of course that doesn’t work. So I do need pictures.

And no one ever tells me if a tag is out, if I’m wearing one ear-ring, or if my lip gloss is smudged beyond my lip line. At times pins are showing when they shouldn’t. Or there’s a stray hair flying freely in the back. If I don’t check well in the mirror before the quick photo shoot, I’m done for. Oh, and the lighting may be off the whole time I’m getting the “shoot” and no one will even notice. And I don’t always get re-takes. It’s drama I tell you.

Anyway, I shall always take pictures, even with people frowning. And please forgive me when I post lots of them. After what I go through to have them taken I feel I must use them all :)

For this hairstyle, I had a twist out that did not look the same on the two sides of my head. I tried to do this and that and in the end I thought why trouble myself. So I fluffed the hair and smoothened it well enough for this kind of styling. I took some shea butter and rubbed on the hair just enough. (can’t use much, as it will go to my scalp and give me grief). I also sprayed a little of my oil concoction. (coconut oil and olive oil). I rolled, pinned and tucked into seven “balls” with three in front, 1 at the centre and three at the back. My hair quickly frizzes out if I work on it a lot and that is what was beginning to happen in the back. And I hate using gels or brushes so sometimes I just endure a not so perfect look here and there :)…

I loved it! Here are a “few” pictures… :)

I also just have to say…I love my photographer dearly, and I am forever grateful. (I feel this sentence was necessary after re-reading post) :) :) :)

DSC_0271DSC_0277DSC_0295DSC_0296DSC_0297DSC_0298DSC_0302DSC_0303DSC_0304DSC_0305DSC_0308DSC_0310DSC_0327DSC_0328DSC_0329DSC_0334DSC_0336DSC_0340DSC_0344DSC_0346


Protective Style Challenge: Week 16; Braid and Twist

$
0
0

_MG_5994

So, last week I mentioned that I would be doing something a little different to combat the encroaching dry weather. Until now I have chosen very low manipulation styles that take about 10 minutes on average to do and only last a week, but because I want to both protect my ends and have a little more access to my scalp, I’ve decided that for the next three months of dry weather I’ll keep my hair in longer term protective styles for the majority of the time. I’ll continue to show a different way to style my hair every week but instead of loose hair I’ll be styling my long term protective styles.

Twists are a great protective style because you don’t have to manipulate your hair too much to create them and depending on how well you plait them they can last a long time. They also allow you to moisturise and wash the hair while they are installed. When the weather is dry the hair suffers from lack of moisture. This can cause the ends of your hair and scalp to dry out and harden. Most people will reach for the extensions during this season but I’ve decided not to use any this year so I needed an alternative.

I plaited the twists on stretched hair. My hair was stretched by threading last week and in order to keep it that way I opted to clean my scalp with a mixture of apple cider vinegar, honey, water and tea tree oil. I moisturised the ends of my hair while it was in a puff so that I could retain the stretch. I needed a bit of length for this style.

African threading

African threading

I was very strict about getting clean lines this time so I used the metal end of a small tooth comb to part the hair. I started by braiding so that the twists would remain tight for longer, the plan is to keep these in for at least three weeks, four at the most. I braided about half a centimetre before I started to twist. I loosely twisted the hair making it tighter as I got to the end so that it is less likely to unravel. The style took about 5 hours to create.

_MG_6009

This is the first time that I’ve tried this method and I absolutely love the results!

PhotoGrid_1430737311169


TWA (Teeny Weeny Afro) Hairstyle

$
0
0

By Naomi of http://www.kinksntwists.wordpress.com

We started with freshly washed hair, apply leave-in conditioner and oil mix. I applied small amounts of Enhancing smoothie and Shea butter to each part then two strand twisted. Next morning, I unraveled twists and picked the roots for volume.

Hair twisted          

PhotoGrid_1404128038130                                                                                                                      

                                                                         Final look.

PhotoGrid_1404055239599  PhotoGrid_1404055318774

Happy Styling.


Behind the scenes of #FashionYapaZed

$
0
0

ZedHair is a proudly Zambian brand. We’re always happy to collaborate with other local companies who have similar values to ourselves as it allows us to highlight the fact that there is currently a fantastic eco system of brilliant emerging brands within the country. ZedHair started out as a blog but we’re now a business and it’s such a great time to be embarking on this transition. There is an awesome sense of camaraderie between young entrepreneurs who realise that we can achieve so much more if we work together, taking advantage of each others strengths.

We love African fashion and when Kamanga Wear, a Zambian ready to wear fashion house, approached us about the possibility of running some sort of social media promotion we jumped at the opportunity. MaFashio are a fashion blog that we love and it was a no brainer to have them get involved with styling and make up. Finally, we asked Fortress, an award winning media company, to sort out the photography and the team was formed.

The first stage of the competition was the top five. They got to choose two items each from Kamanga Wear to wear for the shoot.

IMG-20150401-WA0008

Donna of Kamanga Wear looking through the ladies’ outfits


IMG-20150401-WA0006

Each of the top 5 had mini makeovers which included make up and hair. The contestants all had natural hair.

IMG-20150401-WA0007

Sampa worked with ZedHair to style everyone’s hair.

IMG_3824 as Smart Object-1

Finger coils on a TWA

IMG_3877 as Smart Object-1

Updo on mid length locs

IMG_3858 as Smart Object-1

Bantu knots on a TWA

We wanted the contestants to show off their personalities and they worked with MaFashio to get the styling just right.

IMG_3958

Yuma Besta Chisanga. Top by Kamanga Wear. Skirt and accessories contestants own.

IMG_3993

Lerato Mubu. Shorts by Kamanga Wear. Top and accessories contestants own.

IMG_3869

Mutale Salifyanji Chileshe. Dress by Kamanga Wear

IMG_4055

Christabel Miti. Dress by Kamanga Wear

IMG_4107

Asimbuyu Adaugo Mwangala. Dress by Kamanga Wear


The final stage involved a vote by readers and Asimbuyu Adaugo Mwanagala emerged victorious. Her prize was an outfit from Kamanga Wear, a hamper of ZedHair products and a spread in a leading magazine. She came back to the studio for a second photo shoot and her pictures will be published in the magazine soon.

IMG_6938

The competition has already been featured by TV Guide Magazine, a weekly publication by The Daily Mail of Zambia. We had so much fun working together during the competition that we might just run another #FashionYapaZed in future.

And we’re sure you’ll agree that Fortress Media Zambia did a stellar job on the photography.

IMG_7038

Mwanabibi (ZedHair) , Asimbuyu (Winner) and Sekayi (MaFashio)


Natural Spotlight: Tabitha of Craving Yellow

$
0
0

Processed with VSCOcam with s3 preset

It’s always lovely to have natural spotlight features of people outside Zambia. It shows that we essentially all go through the same struggles with our hair. Tabitha’s blog, Craving Yellow , documents her journey with what can only be described as vibrant imagery, it’s definitely worth a visit. 

Processed with VSCOcam with s3 preset

Where in Africa are you from?

Hi, my name is Tabitha Tongoi. I was born in Nairobi, Kenya and have lived in South Africa, England and the US.

Where are you currently based?

This is a tough one! I am currently in the process of moving from the US to Australia. I have been studying here and will be moving on to pursue further studies in Melbourne.

When did you decide to go natural?

I decided to go natural in July 2011. I was getting ready to move to the United States from Kenya and had no idea how I was going to take care of my hair. I jumped online to try and glean a few tips and I discovered the natural hair community! I was elated at all the beautiful hair that I saw online. Having had thin over-processed relax hair all my life, I couldn’t help but take the plunge! I haven’t looked back since.

What has your experience been having natural hair so far?

I have loooved having my hair in its natural state. In the beginning it was difficult to get used to my new texture. I struggled to learn what my hair needed best, but with time, I was able to figure it out. Having natural hair has taught me to take better care of my body from the inside out. It has also taught me to love the skin I’m in.

What is your hair regimen?

My hair regimen is very very simple! I wash my hair once a week as follows: pre-poo overnight with coconut oil, co-wash with a shampoo/conditioner from the Shea Moisture line, deep condition with Spiral Solutions Deeply Decadent Conditioning Treatment and rinse with Apple Cider. I then do my final rinse with cool water, air dry and seal with Olive Oil. I keep my hair in two-strand twists for three weeks in a month. I also henna and clarify once a month too. Finito!

How did you achieve the hairstyles in these pictures?

Processed with VSCOcam with s3 preset

This style here is a low bun with a simple hair accessory. All I did was pull my hair back and bun it. I added the pearl hair accessory to add some chic flavor to this look. Simplicity is my thing!

HighBun[1]

My other go-to style is a high bun! Notice the trend? Buns are my thing! Again, I gently finger-combed my hair up towards the center of my head. I didn’t neaten up the bun too much because I love the sultry effect of “messy” hairstyles.

Processed with VSCOcam with s3 preset

When I’m not in a bun, I’m in two-strand twists. I simply apply a light oil like olive oil to the length of my hair and then twist it as above. I vary the size of my two-strand twists depending on how much time I have to twist it up.

Any future plans or dreams for your hair?

Yes! I am really eager to reach waist length..! I finally hit mid-back length this year in January. I’m hoping to get to waist length by June/July. Also, I want to keep maintaining the overall health of my hair.

Processed with VSCOcam with s3 preset

Any advice for those considering going natural?

Absolutely! Natural hair is a fantastic journey! There’s so much to learn about taking care of our bodies and our health in general. There’s a wonderful community of women with natural hair online that I am always learning from. Once you take the plunge and get off relaxers, you’ll never look back! Trust me!

Processed with VSCOcam with s3 preset


Protective Style Challenge: Week 17; Rolled Up Twists

$
0
0

IMG_7479

I often look at the intricate styles created with locs these days and wish I could try them. I’m not quite ready for the permanence of locs so I decided to try and see if I could achieve similar results with my twists.

b075bac3849718338fdcf9591bcfa6f9[1]

I found this picture on Pinterest and wanted to try something similar.

 I’ve been moisturising my twists during the week by spritzing with water, applying leave-in conditioner and sealing with a mixture of oils. I’ve done this four times since I installed them last weekend. I haven’t washed my hair but I’ve refreshed my scalp by cleansing with a mixture of honey, apple cider vinegar, water, jojoba oil and peppermint oil.

I started by rolling sections of the twists upwards adding about two twists at a time as I went. I ended up with five rolls and secured each of the sections with bobby pins.

IMG_7467

IMG_7469

IMG_7470

You have to play around with the placement a bit if you want to disguise the pins. I left the other side to sort of cascade down the side of my face but you can keep pinning and have a complete updo.

IMG_7473

IMG_7478

This style literally took about 5 minutes to complete. You can create smaller sections if you don’t mind spending a little more time.


5 Day Natural Hair Style Challenge: Chiteu

Protective Style Challenge: Week 18; Curly Twists

$
0
0

IMG_8223

This week is all about the curls. My twists are starting to look a little bit worn so I decided to curl them up to distract from that and jazz them up a little.

I washed my hair over the weekend; a one step, wash and condition with an African herb cleanser that I’ve been trying over the last few weeks. I applied a leave in conditioner and sealed with mongongo oil. I used flexi rods to curl the hair, installing on Sunday evening and unravelling in the morning. I curled three twists at a time.

_MG_8198

I used orange flexi rods. Placed each rod at the base of the twists and rolled the twists downwards around the rod to create in a spiral shape.

Separating the three twists for a fuller look.

Separating the three twists for a fuller look.

I decided to make the front a little bit interesting by rolling a small section in the bang area and pinning it to the side.

_MG_8206

Pinning the little bang down.

I added a couple of cowry shells to two twists at the front.

_MG_8208

Each shell has a hole through which you pull the twist.

I got the cowry shells from the city centre. If you live in a sub-Saharan African city, or have ever visited one, you’ll know that the streets tend to be the domain of street vendors; people who sell everything from food to electronic goods. I always stop to browse through the second hand books. Last week, I was perusing one stand when a man with locs came up behind me. “Ba Sister!” he exclaimed, “I also have these”. Usually, when someone comes up to you in this manner, they whip out some perfume as soon as they have your attention so I was expecting some similar sort of contraband. Turns out he was selling cowry shells. He obviously decided that I looked like just the sort of person who would want to put them in my hair and he was right. I love them!

IMG_8216


Natural Remedies for Dandruff

$
0
0

By Brandi of http://www.hairinsights.com

Dandruff has to be one of most annoying hair maladies to have. It’s embarrassing because sometimes people can see it, it flakes on to your clothes and lets not forget the discomfort caused by the itchiness.

I spent most of my high school life fighting a losing battle against it and it only died down when I went natural. However, it wasn’t because I went natural that it went away, it’s because of the change in my hair care methods. In my case, hair products with petrolatum or mineral oil cause dandruff so I avoid them.

Who else has had to sit patiently for 30 minutes on wash day while someone “loosened” dandruff from their scalp by scratching it with a small comb? That was a regular occurrence for me. I had to do that because washing alone would not sufficiently clean my scalp. I also went through a small arsenal of anti-dandruff shampoos which would help but I hated being dependant on them. Strictly speaking medicated anti-dandruff shampoos should only be used by those with a serious scalp condition that is determined to be the cause dandruff.

What is dandruff?

Dandruff is essentially when your scalp or any hair bearing part of your body overproduces skin so it flakes off and dies. It irritates the scalp in the process and causes itchiness.  In infancy, scalp dandruff is commonly known as “cradle cap.” (See Chocolate Hair Vanilla Care for cradle cap treatment)

What causes dandruff? (Source)

  • Dry scalp
  • Not shampooing often enough
  • Skin conditions such as eczema — a chronic, inflammatory skin condition — or psoriasis — a skin condition marked by a rapid buildup of rough, dry, dead skin cells that form thick scales.
  • Sensitivity to some hair products, known as contact dermatitis.
  • A yeast like fungus called malassezia which lives on the scalps of most adults, but for some it causes the scalp to overproduce skin cells which results in dandruff.
  • Irritated oily skin, known as Seborrheic dermatitis. This condition is marked by red, greasy skin covered with flaky white or yellow scales

To effectively treat it, you of course need to know what may be causing it for you. The best approach is to use a process of elimination. e.g Start with moisturizing more and regularly basing your scalp with a good natural oil to see if your issue may just be a dry scalp.

Treatments

  • Use natural products. By natural products I mean products that have no sulphates, parabens, mineral oil, petrolatum etc. Basically any products made solely of ingredients that exist naturally in nature. If you have contact dermatitis , natural products will be less irritating for your scalp.
  • Shampoo more often or clarify regularly. Clarifying or shampooing more often will get rid of product build up which can cause dandruff.
  • If you have a skin condition, you may have to seek a medicated shampoo that also treats your skin condition. Alternatively you can try natural dandruff remedies. Some remedies will be given in the next section.
  • Limit use of styling products. (Overuse of product causes product build up)

Natural Remedies

  • Apple cider vinegar rinse: Mix a quarter cup of ACV with a quarter cup of water and spray on to scalp. Leave for 15 minutes and rinse with plain water. Do this twice a week.
  • Baking soda: Wet your hair and then rub a handful of baking soda vigorously into your scalp. Skip the shampoo and rinse with plain water. Your hair may get dried out at first, but after a few weeks your scalp will start producing natural oils, leaving your hair softer and free of flakes.
  • Lime: Squeeze the juice from 1 to 2 limes. Apply it to the dandruff zone. Scratch into the scalp area and leave for for about 3 minutes. Then rinse out. Repeat each day over 2 to 3 days; the dandruff should start to retreat.
  • Tea tree oil: Mix a couple of drops of pure tea tree oil in with your regular shampoo and wash as normal.
  • Coconut oil: Before showering, massage 3-5 tablespoons of coconut oil into your scalp and let sit for about an hour. Shampoo normally. You can also look for a shampoo that already contains coconut oil.
  • Lemon: Massage 2 tablespoons lemon juice into your scalp and rinse with water. Then stir 1 teaspoon lemon juice into 1 cup water and rinse your hair with it. Repeat this daily until your dandruff disappears.

Remember if none of the treatments or remedies work you should see a dermatologist to determine the root cause of your dandruff problem.


#AfricaDayNaturals: Celebrating Africa Freedom Day

$
0
0

PhotoGrid_1432285423665[1]

On Monday the 25th May we commemorate Africa Freedom Day and ZedHair is going all out to really make it a celebration of Africa and what we love about this vast, vibrant, dynamic continent. Africa is not a country but despite our differences, we all share a special intangible bond. It’s not about the music we listen to, the way we dance or the food we eat. It’s a sense of community steeped in our rich culture and built on our shared struggle to attain freedom and prosper in our own unique way.

Here at ZedHair, we are immensely proud of our heritage and decided to reach out to other African natural hair bloggers across the continent and in the diaspora. We aim to get as many Africans as we can to speak positively about Africa at once.

So, how are we going to do this? Well, this is a call to action. We already have bloggers from Nigeria, Zimbabwe, Ghana, Kenya, Zambia, Namibia and South Africa taking part in our Africa Freedom Day celebrations but we need more. All you need to do is:

  • Send us your photo (info@zedhair.com) or post a photo to social media (Twitter, Instagram and Facebook) tag @zedhairdotcom on Twitter.
  • Tell us which country you are from.
  • Use the hashtag #AfricaDayNaturals .
  • Complete this sentence, “I like being African because…..”
  • Tag your friends and invite them to join in.

Start sending your pictures in now and you’ll be featured on our blog and/or Facebook page. Pictures will be shared throughout the day on Monday 25th May.

PhotoGrid_1432287009296[1]

Let’s help change the narrative. Your continent needs you!


Protective Style Challenge: Week 19; All About Scarves

$
0
0

PhotoGrid_1432639971511

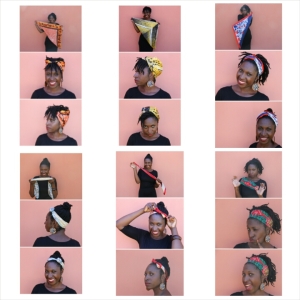
This week is a bit of a cop out but also a style bonanza. It’s a cop out because I’m not really styling my hair but I am going to show you lots of styles that you can achieve with scarves.

My twists are looking a little bit worse for wear but I’m not quite ready to let go of them so I’m doing what I tend to do when I don’t feel like having to deal with my hair and reaching for scarves.

Scarves have been a mainstay of my styling repertoire since my second year of being natural. Scarf styles are really easy to create and will cheer you up on the dreariest of days.

I decided to show you 5 easy scarves to try, seeing as I’m meant to keep my protective styles for 5 days every week.

All my scarves are some sort of smooth, synthetic material like silk, satin or polyester.

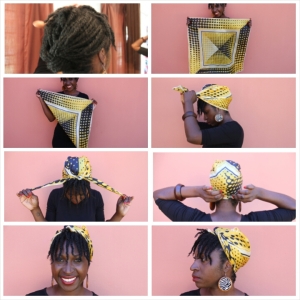
Style 1: The Signature Scarf

I call this one the “signature scarf” because it’s my favourite, my go to style. I don’t get to do it much on loose hair these days, because my hair is a little longer and I would need to use it on shrunken hair to get the kind of look that I like.

PhotoGrid_1432642106043

You’ll need a square scarf tied in half for this one. Tie it at the front and either tuck the ends of the scarf in or tie them at the back. Make sure the hair around the sides of your head is smoothed upwards. Tuck the triangle at the top in at the back.

If you like to have the hair fall over your forehead you can leave a little hair at the front out and tie the rest up in the scarf as a second option.

PhotoGrid_1432642228328

Style 2: The Fringe

PhotoGrid_1432641800903

Part your hair into two. Leave the front to fall forward and plait the back in a loose braid, it doesn’t matter how neat. You’ll need a square scarf tied in half. Tie the scarf with the knot in between the plaited section and the fringe. Tuck the top of the triangle under the knot. There you have it a fringe.

You can play around with the fringe, using pins to create more of a shape.

PhotoGrid_1432641926183

Style 3: Top Knot

PhotoGrid_1432641545288

Fold a square scarf into a long rectangular shape and tie it as you would a band with the knot at the front. Cross the ends of the scarf again without tying and either tuck in the ends or, if your scarf is long enough, tie them at the back.

You can leave your hair loose or have it in a bun for a more put together look.

PhotoGrid_1432654514044

Style 4: Flower power

PhotoGrid_1432641352458

Fold a square scarf into a rectangular band and tie it at the front. I like to tie this at a skewed angle. Cross the ends of the scarf so that you create a sort of rope. Twist the rope around itself to create a flat flower shape.

Style 5: The Bow

PhotoGrid_1432641237008

This is the easiest of all the scarves to tie. You’ll need a small square scarf for this one. Fold the scarf into a triangle and then fold the triangle into a rectangular band. Knot the scarf at the front. It already looks like a bow at this point and you can leave it if you like but I prefer to tuck the ends in.

Bonus Style!

PhotoGrid_1432639002548

This is not one of my scarf creations. It’s a ready made Chitenge (African print) hair band for those days when you really just want to get up and go.

There you have it; 6 scarves, 9 hairstyles! Is there any better way to disguise your shabby twists?

PhotoGrid_1432639652702

Next week my hair comes out to play for a bit.


Protective Style Challenge: Week 20 Lupita Nyong’o’s Ballerina Bun

$
0
0

PhotoGrid_1433160499859


I undid my twists this morning, looked in the mirror and was really overwhelmed by how much hair there was. It looked so thick and I wondered how I ever manage to style it.

Anyway, I’m on week 20 of my protective style challenge. 20 weeks of different hairstyles! I thought that I would really struggle to get this far but I’m still having fun and there are still lots of styles left to try. Next week I’m back in a long term protective style to shield my hair from the dry weather so I thought I’d go all out this week and really get into the styling, outfit and all.

PhotoGrid_1431589898051


A couple of weeks ago Kenyan actress Lupita Nyong’o styled her hair like this for the red carpet at the Cannes Film Festival and as usual caused a huge buzz. She called it the donut and it’s also known as a ballerina bun. Here is my take on it:

Step 1

Tie the hair into a high puff. I used a band made from a pair of old tights. I tend to slide the band up at the back until just where the head curves and then tie it at the front.

IMG_9527

Step 2

Gather the hair in the puff together and plait the ends into a tiny braid. It’s ok if you don’t get all the hair in. You don’t want the bun to be too tight. Just smooth any loose hairs in to place.

IMG_9531


Step 3

Tuck the braid in to the bun so that it isn’t visible.

IMG_9534


That’s it. You’re done.


PhotoGrid_1433160115643


I added a scarf to make it a little more interesting.

IMG_9543


To get the look Lupita rocked on the red carpet I used a gold necklace and placed it around the band at the base of the bun.

PhotoGrid_1433160030566


My dress isn’t as floaty as Lupita’s but I had fun trying.

PhotoGrid_1433159869064


Detangling Your Natural Hair

$
0
0

By Naomi of http://www.kinksntwists.com

Hello Naturalists.

What detangling method do you use? How long does it take? What products do you use?

Detangling hair is one of the most important steps during your natural hair journey. It helps retain length, checks breakage and reduces knots and tangles.

Finger Detangling: Here is how my detangling routine goes – I section hair into four parts, two in front and two at the back. I apply two to four tablespoons of Coconut oil then twist hair. Once oil application is done, I unravel twists one at a time, make smaller sections and finger detangle then re-twist each section into three parts. I start from the ends of my hair and work my way to the roots. I follow up with a wide tooth comb. Finger detangling loosens the hair enabling use of the comb or brush much easier afterward.  This method works well for me- I can feel the knots so I work through the strands systematically removing all knots. Wide tooth comb detangling was easier when I had a TWA. When detangling is done, I wash my hair and style (checkout wash day routine post). The whole routine takes about forty five minutes.

Wide Tooth Comb Detangling: On a lazy day, I use a wide tooth comb to detangle my hair. I section hair into six sections and apply coconut oil and conditioner to each section. Once done, I comb my hair from tip to root and repeat the process under the shower then re-twist. I follow up with usual wash routine and style. The whole routine takes about thirty minutes.

Finger detangling takes a while, but I highly recommend.

For both methods, I find the the hair turns out even better when I keep products overnight.

Much Love,

Naomi.


Protective Style Challenge: Week 21; Chunky Flat Twist Updo

$
0
0

IMG_0275

It’s week 21 of my protective style challenge. As I mentioned last week, I’ve decided to go back into a longer term protective style after a weeks break. This one should last me 3 weeks, till the end of June and then I’ll probably do another long term style to last until the end of July when the dry weather dissipates.

Over the weekend I washed and conditioned my hair with henna. I decided that this time I would try a flat twist updo but in typical Mwanabibi fashion it’s not as put together as it could be. I started out attempting smaller flat twists but I’m just not patient enough and in the end I settled for what I’m used to. The flat twists are chunky and I used the same method to twist my hair as I did in week 16.

_MG_6009

To achieve this look I parted my hair into three sections. Two sections on each side to flat twits up ward and two strand twists down the middle. I plaited 4 flat twists on each side.

IMG_0229


IMG_0232

IMG_0238

This week I’ve pinned all the twists up.

Step 1:

Pin the ends of each flat twists across to the other side of your head so that they are tight enough to look neat.

IMG_0247

Step 2:

Separate the two strand twists into two sections. Take the back section and pin the twists at the crown. Create a pompadour with the twists at the front, playing around with them to create your desired shape.

IMG_0250

IMG_0256

I will attempt to style the hair a different way for the next 2 weeks before I take this style down.

PhotoGrid_1433763174674[1]


Pillowy Soft Candy Floss Hair

$
0
0

By Chiteu of http://www.bellamufazi.com

The number one question I get about natural hair is “how do you maintain it?” I’ve heard every complaint and excuse in the book, from my hair is too hard to you just have “good” hair. I’ve said it before and I will continue to say it, if you treat your hair well it WILL respond.

For too long we have not understood our hair and this lack of understanding has led to our inability to care for our hair correctly and a loathing for and perception that natural hair in general is DIFFICULT.

So lets go back to basics, what do we know or have we learnt about natural hair that we need to unlearn. What new hair practices can we adopt that will not only lead to more manageable hair but hair that we can enjoy just the way it grows out of our heads!!!

1. Deep Conditioning: When somebody says they want soft natural hair one of the first things I ask is whether they have ever deep conditioned their hair. More often than not the answer to this is NO. Interestingly even when people have relaxed hair very few of them will condition their hair whether by using hot oils or protein egg yolk based products like Cholesterol or hair mayonnaise. I have found that deep conditioning does wonders for my hair, it allows the oils or proteins to penetrate my hair shaft, fill in the gaps in the hair shaft which can lead to breakage and for my hair to soak in all that goodness. I use homemade deep conditioners which I find work just as well if not better than store bought ones *besides that fact that I know exactly what is going into them*.

My favourite is 2 – 3 tablespoons of mayonnaise, 1-2 tablespoons of avocado oil, a few squirts of honey, 1-2 tablespoons of Tresemme Naturals conditioner. You can added any oils of your choice like extra virgin olive oil, coconut oil or grapeseed oil depending on what your hair may need. Mix together and apply to hair for 30 mins.

Some hair doesn’t like protein deep conditioners and may be brittle after so a hot oil treatment may be a better option.

2. Moisture: natural hair is hard they say, I have heard this so many times, my eyes unconsciously roll on their own *hehehe* but to be fair this belief is is true for most of us that were natural heads as little girls. Our mothers,aunties,grannies didn’t know any better so weekends were filled with fine tooth combs, lots of yanking and tugging and tears. When I was about 8 I made friends with a girl that could cornrow and made sure she did my hair which I would keep for 3 weeks at a time just to avoid the Saturday morning combing session with my mom.

What makes natural hair hard? Unlike other hair types natural hair tends to be tightly coiled. This prevents the natural oils produced by the scalp from going all the way down the hair shaft.The result is dry hair. This means we have to help our hair along and the best way to do this is to introduce moisture *and noooooo I don’t mean that bottle of pink oil moisturiser!!!*  In the world of kinks and coils moisture= water.

Washing your hair at least once a week is a start. I know I would go for weeks without washing my hair and most of us are guilty of this. A lack of moisture in the hair only means that it’ll be drier and harder to manage. In addition to washing the hair once a week I would recommend giving the hair a moisture boost in between wash days by using a spritz to revive and liven up the hair. A spritz can basically contain only water or be mixed with an oil or a humectant like glycerine. Imagine a cooling mist on a hot and humid day to cool you down. A spritz has the same effect on hair, it gives the hair a little lift to keep it going. Gylcerine is a humectant which means it draws moisture from the air onto the hair and is a great addition to a simple spritz. I spritz my hair every other day depending on what my hair needs. In the winter because of the dry air I will spritz my hair more often than in the drier months. Understanding and listening to your hair and its needs is crucial to maintaining its health.

To make the spritz you can add one part glycerine/oil to 3 parts water. I use the spray bottles from the gardening section and if you’re lucky you can find the calibrated ones. When I want one that will last a few days I use a little spray bottle like the ones which contain hair spray, body mists or pocket air freshners. The little spritz bottle I use when I am not using the spray bottle from the gardening section.

3. Sealing in Moisture: Once you have intorduced moisture to your hair it is important to lock that moisture in. The best way to seal moisture is to apply an oil to slightly damp hair. This can be an oil mix where different oils are mixed together or a single oil. My utmost favourite is jojoba oil which leaves my hair in an almost silken state. I also love coconut and avocado oil.

If you start to do these 3 things you will notice a huge difference in your hair…….I would love for a few of you to try it and comment on this post with your experiences. Here’s to more of us embracing our coils, understanding them and loving our natural hair so no more hiding under them weaves, wigs and cornrows!!!!


Viewing all 206 articles
Browse latest View live